
Creating a New Malomo Flow Using the Klaviyo Library
If you’re looking to trigger transactional or post-purchase messaging using Malomo’s Klaviyo integration, the Klaviyo Library makes it fast and easy to launch Malomo-branded flows that drive engagement and retention.
In this guide, we’ll walk through how to create a new Malomo-powered flow using the Klaviyo Library in just a few steps.
What is the Klaviyo Library?
The Klaviyo Library is a pre-built collection of flow templates designed to help you get started quickly. Each of our flows include:
Recommended triggers and filters
Pre-written subject lines and copy
Email designs (ready for your own customization)
Built-in Malomo variables for all order notification live text
Which Malomo Flows are Available?
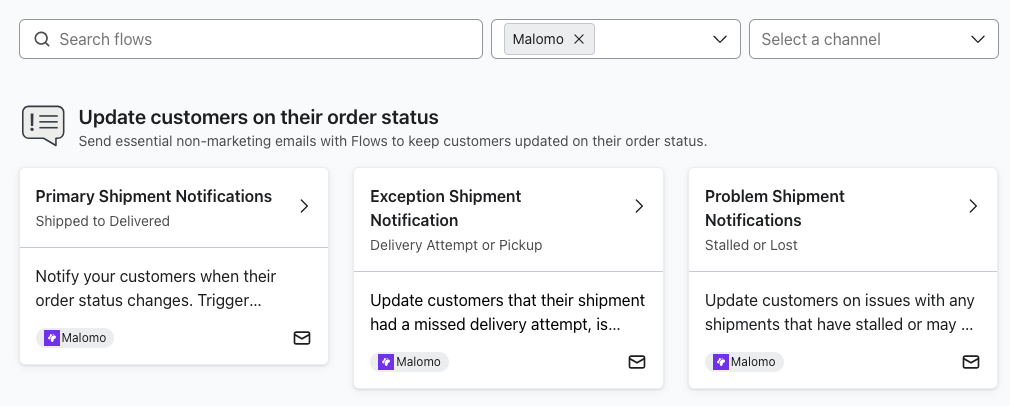
Malomo has three flows published within the Klaviyo library which are available to merchants that have installed our Klaviyo integration.
Primary Shipping Notifications: Notify your customers when their order status changes. Trigger notifications when their shipment is packed, picked up by the carrier, marked out for delivery, or delivered.
Exception Shipment Notifications: Update customers that their shipment had a missed delivery attempt, is available for pickup, or will be returning to sender.
Problem Shipment Notifications: Update customers on issues with any shipments that have stalled or may be lost.
Learn more about Malomo events and shipping statuses in our article, Klaviyo Integration Flow Triggers and Filters.
How to Create a New Flow from the Library
Step 1: Navigate to the Klaviyo Library
Log in to your Klaviyo dashboard.
In the left sidebar, click Flows.
In the top-right corner, click Create Flow.
Use the integration drop down and select Malomo to surface flows powered by the Malomo integration.
You will only see Malomo flows if you’ve installed Malomo’s Klaviyo integration and the Malomo event metrics have started to sync to your account. This may take a few hours depending on how fast new orders and fulfillments are coming into your shop.
If your brand is in a pre-launch state without active orders, you will need to create a test order and fulfillment, in order to trigger the Malomo event metrics to push to Klaviyo.
Step 2: Select a Malomo Flow Template
Choose from the three available Malomo flow templates, such as:
Primary Shipping Notifications - Includes four emails for these situations:
Package is packed and ready to ship:
pre_transitCarrier has picked up package:
in_transitPackage is on the truck for delivery:
out_for_deliveryPackage has been delivered:
delivered
Exception Shipment Notifications - Includes three emails for these situations:
Carrier has attempted to deliver but has failed:
failurePackage is available for pickup at a local office:
available_for_pickupPackage cannot be delivered and is being returned to the sender:
return_to_sender
Problem Shipment Notifications - Includes three emails for these situations:
Order is placed by has stalled before a shipment has been created:
FulfillmentStalledPackage is en-route but has stalled:
ShipmentStalledPackage location and status is unknown
Click “Use Template” to create a new flow based on that design.
Step 3: Review & Edit Your Flow
Once the flow is created:
Click into the flow to open the visual builder.
Customize the trigger or filter if needed. By default, Malomo event triggers will be pre-configured.
Click into each email block to:
Edit the subject line or preview text
Customize the body content or insert images
Adjust branding (logo, colors, fonts)
Learn more about how to personalize Malomo email templates here.
Step 4: Confirm Your Default Tracking Page URL
The Track Your Package button within the order status emails will link to the Default Tracking Page URL set for your account unless you manually enter in a URL while editing the email.
To configure your Default Tracking Page URL, navigate to the Account section in the dashboard. Paste the base URL of your tracking page in the Default Tracking Page URL section. Click Update Account when finished.
If you've used our Shopify Theme App or Malomo.js to host your tracking page, your base URL might look like this:
https://yourbrand.com/pages/order-trackingMalomo hosted tracking pages are formatted like this:
https://yourbrand.mymalomo.comorhttps://yourbrand.mymalomo.com/xxxxx
To read step by step instructions, check out our Linking to your Tracking Page in Klaviyo article.
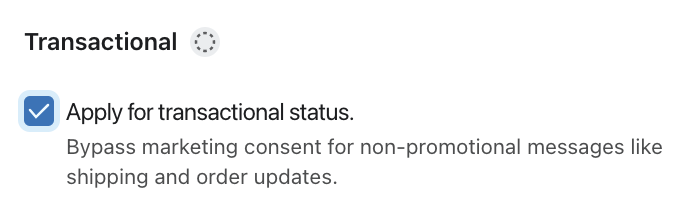
Step 5: Mark Emails as Transactional
Getting any new order notification emails marked as transactional in Klaviyo is an important step, as it ensures all customers receive these emails (including customers who have opted out of marketing emails).
Once you are done with all email edits:
Click into the flow to open the visual builder.
Click on the email.
In the Email Details menu, scroll down to the Transactional section.
Click the Apply for transactional status checkbox.
Click Submit for review.
Step 6: Set the Flow Live
Once you're happy with the flow:
Test each email by sending yourself a preview or using Klaviyo’s event replay tool.
Disable your current order notifications. If you’re currently sending notifications using Shopify’s default notifications, learn how to disable these here.
Click Review and turn on to enable all emails in the flow or click Live on each individual email to start sending.
You’re All Set!
You’ve now created a new order notification flow powered by Malomo events and templates. As customers place orders and tracking events are triggered, Klaviyo will automatically send your branded transactional notifications.
Learn more about how Malomo’s Klaviyo Integration with these articles: