
How to Set Up a Rebuy Widget for your Malomo Tracking Page
Adding a product collection to your tracking page can be a great way to drive repeat purchases. By utilizing the Rebuy widget, you can add a dynamic product collection to your page, which will refresh the products shown for each customer based on what they’ve previously purchased.
Article Contents:
Adding a Rebuy Widget to an Existing Shopify Theme App Tracking Page
Adding a Rebuy Widget to a Malomo Built and Hosted Tracking Page
Direct Customers to Your Tracking Page with Personalized Rebuy Recommendations
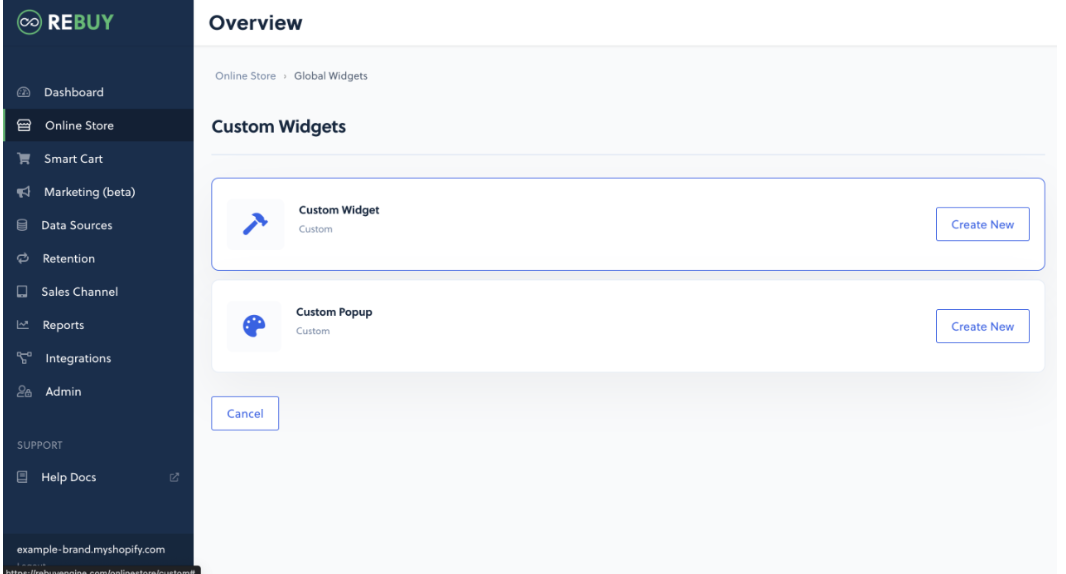
How to Create a Widget in Rebuy
Here's a quick look at the steps:
Within the Rebuy admin section, navigate to Online Store, and select Custom Widgets.
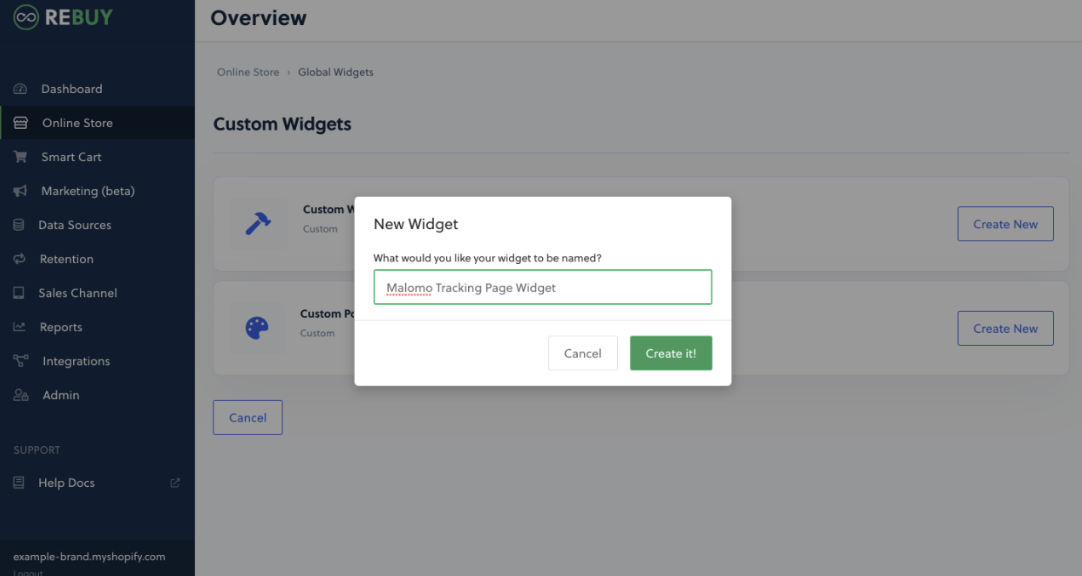
Be sure to select “Custom Widget” and not “Custom Popup”, then name your new widget accordingly.
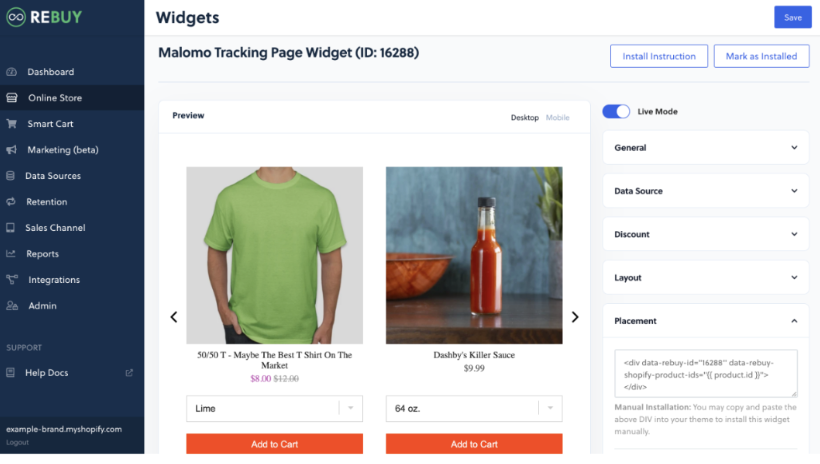
Ensure that your widget settings are set to the following:
Live Mode ON
Data source rule has something set to ensure data is being returned. We recommend using the rule “If anything, return AI recommendations”.
From here, you can tweak the design and layout to your liking.
After the widget is created to your liking, navigate to the Install Instructions section, and grab the widget code from the Placement section. This will be the <div data-rebuy-id> section of the code.
Use the script above from #2 and plug in your own Shopify brand slug.
Place your new widget on your tracking page!
Here's a deeper dive into each step:
From the Rebuy admin, navigate to the Online Store tab. From here you can see the most popular locations you can upgrade your online store as well as a list of all created widgets. Select "Custom Widgets".
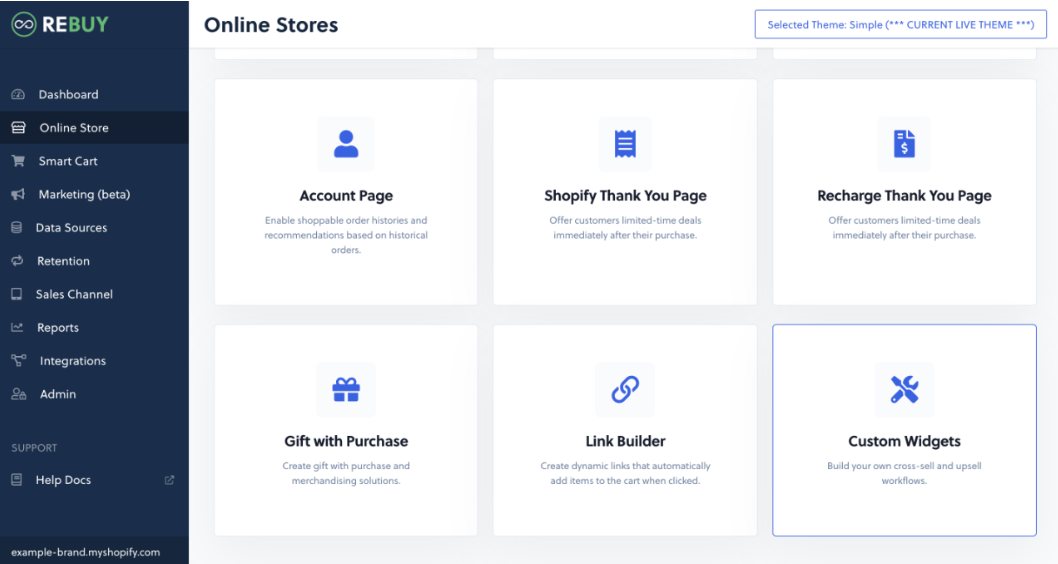
If you haven't already created some custom widgets, you'll see a menu with some prebuilt configurations, select "Custom Widget" not "Custom Popup". Otherwise, select "New Widget" on the top right-hand side of your screen to see the list of pre-configured options.
Give it a Good Name!
The Data Source (Recommendations)
The "Data Source" is how Rebuy powers the widget and shows the customer relevant recommendations. You can use AI, Top Sellers, as well as curate and hand pick your own recommendations based on what the customer has purchased. After you create your custom widget, it will default to a blank rule. You can either change this to some of the preconfigured data sources ( AI, Top Sellers, Buy It Again) or edit the created data source and make your own recommendation. Malomo recommends using the rule “If anything, return AI recommendations”. Please make sure the data source rule has something set to ensure data is being returned. For more on Data Sources, check out our list of articles here.
Styling and Language, and Presentation
Determine what you want the language of the widget to say, how many recommendations you want to show the customer (we generally show 4 at a time in a carousel with more options), possible discounting, etc. To learn more about creating product page rules for your new widget, check out this Rebuy article. If you want a deep dive into widget settings, check out this Rebuy article.
Creating a New Shopify Theme App Tracking Page with a Rebuy Widget
Create a new tracking page using the Malomo Tracking Page Creator
Check Add a Rebuy Widget
This option will display if your store is associated with a Rebuy account. Check the box to include a Rebuy app block on your tracking page.
Style the tracking block
Add your Rebuy Widget ID
If you chose to include a Rebuy app block on your tracking page, you’ll need to add a widget ID before you see any content. You can find your widget ID in the Rebuy platform on the Widgets page.
From the Layers panel, click on Apps › Rebuy Widget
In the Settings panel, enter your Rebuy Widget ID in the Widget ID field
Click Save to populate the app block content
Save your changes and preview your page.
Adding a Rebuy Widget to an Existing Shopify Theme App Tracking Page
Navigate to an existing Shopify Theme App tracking page.
Click Add Section and navigate to the Apps section.
Click Rebuy Widget.
Enter in your Rebuy Widget ID and adjust any related settings. Hit Save.
Adding a Rebuy Widget to a Malomo Built and Hosted Tracking Page
If you have a tracking page built and hosted by Malomo, you’ll need to contact a Malomo team member to assist with the final install steps. Please reach out to your CSM or contact the support team. After you've completed all the necessary steps to create your widget, you'll need to copy and paste the div, or widget id, and ask the Malomo team member to add it to your tracking page.
There are two pieces to the widget code that you’ll need to include:
1. <div data-rebuy-id="###"></div>
The ### in this case will be your Rebuy account numerical widget ID.
2. <script async src="https://rebuyengine.com/js/rebuy?shop=XXX.myshopify.com"></script>
The XXX will be your Shopify brand slug.
Example:
<div data-rebuy-id="34496"></div>

<script async src=“https://rebuyengine.com/js/rebuy?shop=cwspirits.myshopify.com”></script>
Woohoo! You're Done
You should now have powerful recommendations on your newly upgrade Malomo tracking page.
Updating Your Widget
You will be able to make updates to the widget to change out any products or data sources, as well as any style updates necessary. These changes will automatically be updated on the Malomo tracking page once the changes are made
Direct Customers to Your Tracking Page with Personalized Rebuy Recommendations
Once you have created the widget and it is embedded on your tracking page. You will want to update the URL structure behind the Track my Package buttons, or anywhere that links to the tracking page from the customer emails to the following url structure:
For Malomo Hosted Tracking pages:
https://examplebrand.mymalomo.com?_m_alt_id={{ event.extra.order.meta.shopify_order.id }}&_m_tracking_code={{ event.tracking_code }}For Tracking Page hosted on your website (Shopify Theme App or Malomo.js setup):
https://examplebrand.com/ordertracking/?_m_alt_id={{ event.extra.order.meta.shopify_order.id }}&_m_tracking_code={{ event.tracking_code }}